Like many of you I am sure, I follow eBay and Craigslist keenly, hoping to find that elusive part or a good Viscount or Lambert bike at a bargain price (and not on the far side of the Atlantic). But I do not want this blog to become just a place where the latest bargains (??) are posted; not least because they quickly become out of date. However, I have to make an exception for eBay item number: 230781749334, 1976 Viscount Cycles Complete Dealer Manual.
This looks to be a fascinating document, beyond my means unfortunately, but including such gems as an explanation of how the end float in the needle bearing pedals can be taken up by fitting shims. Some of the pages have dates in 1975 and it is clear that Yamaha was the US dealer, the manufacturer continuing to be Trusty Manufacturing.
Friday, 27 April 2012
Sunday, 30 October 2011
Broken bottom bracket spindle!
Last week I suffered a broken bottom bracket spindle on my Viscount Pro bike, which dates from about 1978. Like some other Lambert and Viscount components, the spindle has had a bad press, but I reckon around 33 years is not a bad service life for such a highly stressed part. The break was not at the circlip grooves, which have been suggested as bad features of the design by acting as stress concentrators, but right against the left hand (non-drive side) crank - possibly where the taper starts. I think the break may have begun a couple of weeks ago - there had been some creaking from the crank. Before that the crank had worked loose a couple of times - so perhaps the unusual stresses had initiated the crack that began the break.
 Not having a spare Viscount spindle handy, I took one from another of my bikes - a Viscount Aerospace Sport, also dating from the late 1970s. The bottom bracket bearings on the Sport were almost seized and needed replacing anyway.
Unfortunately, unlike when I replaced the bearings in the Pro a few blogs ago, the replacement spindle was very difficult to remove from the donor bike. I had to bash it hard with a big hammer and consequently I had to file the tapers back into shape afterwards. It proved to be quite rusty in the middle part. Eventually I got the new spindle into place on the Pro (the earlier blog has more details of the process and photos). I hope the bad treatment with the hammer has not started any micro cracks that will limit the life of the replacement.
In the blog about bottom bracket bearings (4 February 2011) I was a bit vague about the length of the spindle. In fact the Viscount bottom bracket shell is the British standard 68mm, so there is 68mm between the circlip grooves. On the drive side there is 29mm to the end of the spindle, on the left it is 24mm, making 121mm total length. The asymmetry is to do with getting the right chain line, but it is a bit of a mystery why it was done that way and replacement with non-Viscount symmetrical 124 or 125mm spindles seems to work as well as, if not better than the original.
There has been a long gap in these blogs but I hope to get going again. Thanks for the interesting comments. I will be answering questions raised and discussing other Viscount & Lambert issues. Subjects that have occurred to me include: model names and specifications; decals (transfers) and stickers; brakes; saddles; other unique parts; and frame numbering. Perhaps we could start a register of Lambert & Viscount bikes?
Sunday, 22 May 2011
Sealed bearing hubs
This article has been on my mind for some weeks, when I took the photographs that are below. It is about the history and servicing of Viscount and Lambert branded wheel hubs.
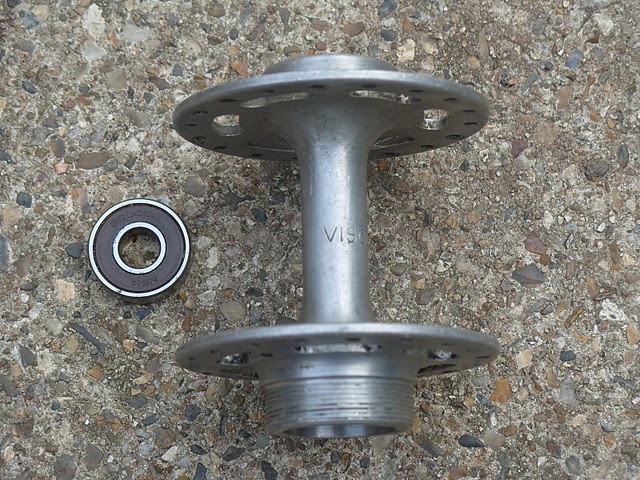
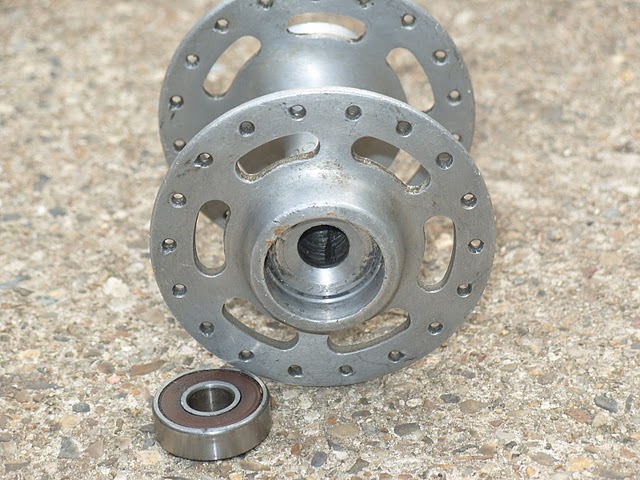
Most Lambert and Viscount own-brand hubs - that is those that are stamped either ‘Lambert’ or ‘Viscount’ - have ‘sealed’ or cartridge bearings. I say ‘most’ because some do appear that have conventional (cup and cone) bearings. Some of these have it seems been converted from sealed bearing ones, but others were apparently made that way. Why this was, I don’t know. Has anyone any information?
All the own-brand ones are high-flange (HF) types. When Viscount stopped using the own brand hubs (I would put this in 1977 or 1978, but it might have phased in earlier), they went over pretty consistently to Shimano HF ones, of no particular group set (this might need checking, but they certainly weren’t from a well-known one like Dura Ace or 600). Later on, from 1980, the Aerospace bikes used Shimano 60, 600 or even Dura Ace low flange (LF) hubs. These are all alloy hubs. Non-Aerospace bikes might use steel hubs.
This might seem a bit confusing, but it is usually easy to tell what you are dealing with:
LF ? - conventional hub. Manufacturer confirmed by branding stamped on the shaft.
HF ? - stamped ‘Lambert’ or ‘Viscount’ or sometimes completely blank (the stamping seems to have been a bit hit and miss) - very probably sealed bearing type. Shimano or other manufacturer - conventional bearings.
These are of course the hubs as the bike left the factory and a bike might well have been re-wheeled.
The sealed bearing hubs are likely to cause the most problems, but they are not really difficult. Problems that ae likely to happen are that the bearing itself becomes stiff, loose or rough or that the whole cartridge becomes loose in the housing that it fits in in the hub. The latter is potentially the most serious and may not be fixable. The cartridge bearings are cheap to buy and fairly easy to fit.
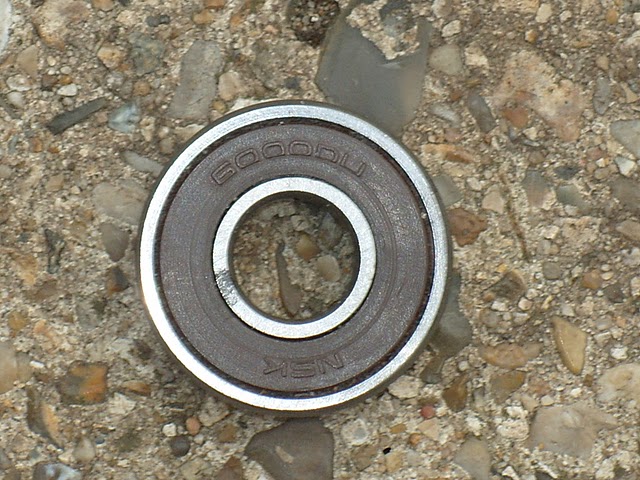
I covered cartridge bearings quite a lot when I wrote about the bottom bracket - see . The bearings for the wheels are type 6000 - 10mm bore (inside diameter), 26mm outside diameter and 8mm thickness. You will probably buy type 6000-2RS meaning that they have double rubber seals - i.e. both sides are sealed. You can see that the one I took out of the hub shown is a 6000DU. DU or DDU means double contact seals. Another common type which looks similar and may be ok is one with the suffix ZZ, meaning double shielded. In this case I think the shields are metal. All my knowledge about bearing numbers comes from the Gizmologist’s Lair.
To service a hub a couple of basic tools are helpful to have. Or at least improvise reasonable alternatives. Number one is a mallet. This is like a hammer but with the business end made of wood or rubber. Some of the bits are fairly soft or vulnerable - the alloy hubs and the threads on the axle particularly - and hitting them with the unforgiving steel of your favourite hammer is likely to damage them. Second is something similar to a 6” nail, for knocking out bearings. Could be a nail or an old quick release skewer. A bearing puller would be nice, but is not essential. This is a device with hooked jaws that pass through the bore of the bearing, which is then pushed or pulled out. Here is one from Loose Screws, one of my favourite suppliers of hard-to-get bike bits. There’s also a good description of how to use it.
Most Lambert and Viscount own-brand hubs - that is those that are stamped either ‘Lambert’ or ‘Viscount’ - have ‘sealed’ or cartridge bearings. I say ‘most’ because some do appear that have conventional (cup and cone) bearings. Some of these have it seems been converted from sealed bearing ones, but others were apparently made that way. Why this was, I don’t know. Has anyone any information?
All the own-brand ones are high-flange (HF) types. When Viscount stopped using the own brand hubs (I would put this in 1977 or 1978, but it might have phased in earlier), they went over pretty consistently to Shimano HF ones, of no particular group set (this might need checking, but they certainly weren’t from a well-known one like Dura Ace or 600). Later on, from 1980, the Aerospace bikes used Shimano 60, 600 or even Dura Ace low flange (LF) hubs. These are all alloy hubs. Non-Aerospace bikes might use steel hubs.
This might seem a bit confusing, but it is usually easy to tell what you are dealing with:
LF ? - conventional hub. Manufacturer confirmed by branding stamped on the shaft.
HF ? - stamped ‘Lambert’ or ‘Viscount’ or sometimes completely blank (the stamping seems to have been a bit hit and miss) - very probably sealed bearing type. Shimano or other manufacturer - conventional bearings.
These are of course the hubs as the bike left the factory and a bike might well have been re-wheeled.
The sealed bearing hubs are likely to cause the most problems, but they are not really difficult. Problems that ae likely to happen are that the bearing itself becomes stiff, loose or rough or that the whole cartridge becomes loose in the housing that it fits in in the hub. The latter is potentially the most serious and may not be fixable. The cartridge bearings are cheap to buy and fairly easy to fit.
I covered cartridge bearings quite a lot when I wrote about the bottom bracket - see . The bearings for the wheels are type 6000 - 10mm bore (inside diameter), 26mm outside diameter and 8mm thickness. You will probably buy type 6000-2RS meaning that they have double rubber seals - i.e. both sides are sealed. You can see that the one I took out of the hub shown is a 6000DU. DU or DDU means double contact seals. Another common type which looks similar and may be ok is one with the suffix ZZ, meaning double shielded. In this case I think the shields are metal. All my knowledge about bearing numbers comes from the Gizmologist’s Lair.
To service a hub a couple of basic tools are helpful to have. Or at least improvise reasonable alternatives. Number one is a mallet. This is like a hammer but with the business end made of wood or rubber. Some of the bits are fairly soft or vulnerable - the alloy hubs and the threads on the axle particularly - and hitting them with the unforgiving steel of your favourite hammer is likely to damage them. Second is something similar to a 6” nail, for knocking out bearings. Could be a nail or an old quick release skewer. A bearing puller would be nice, but is not essential. This is a device with hooked jaws that pass through the bore of the bearing, which is then pushed or pulled out. Here is one from Loose Screws, one of my favourite suppliers of hard-to-get bike bits. There’s also a good description of how to use it.
A few weeks ago a friend showed me how to build wheels: to make a pair of gold-hubbed sprint wheels for the gold Lambert I am building up. Part of the wheel building was servicing the hubs and fitting new bearings. A couple of things emerged from this. One was that it is useful to have a vice (vise in US English) for the work and the other was that it is easier to deal with hubs than a complete wheel. An engineer’s bench vice would be best, with aluminium or hard plastic soft jaws to protect the hubs, but I’m sure any type could be pressed into service. Without a vice, carefully supporting the hub or wheel on wooden blocks will work.
If the bearings in a hub are smooth and are firm in the hub shell; and if there is nothing wrong with the axle it is probably best to leave it alone. There is however no point in trying to resuscitate a suspect bearing, as they are cheap.
Assuming that you need to change the bearings, first knock out the axle if present. The Lambert / Viscount axle has no shoulders - it is just plain 10mm diameter in the unthreaded section - so one bearing might come out or it might stay stuck in.
Knock out the remaining bearings with your nail or more sophisticated bearing puller. Bearings come ready greased but you might want to add some. It’s difficult to do later. The rubber seals can be prised off with a knife or small screwdriver and grease added before pressing the seal back into place. Just do this on one side of each bearing and make sure that side is assembled to the inside of the hub, in case you damage the seal.
The bearings have been known to work loose in the housings in the hub, for reasons that are not clear, but I think that Loctite or similar locking compound should be used.
Put the bearing on to the axle at about the right position - by squeezing in the vice or tapping. It’s not necessary to use locking compound on the axle. Fit the bearing into the hub and then squeeze or tap the second bearing into place. The position of the axle can be adjusted. Make sure that the axle turns smoothly and the bearings are not binding. Fit the lock nuts and spacers if required. Tighten the lock nuts so that they are snug against the bearings but do not load them. These ball bearings are not made to be end loaded.
Next time - perhaps pedals or transfers (decals).
Happy pedalling.
Sunday, 3 April 2011
Lambert and Viscount links
I am adding some links to web sites about Lambert and Viscount bikes that I have found useful and interesting. The list of links is on the right. I will continue to add to this.
The resource that people often find first is that on the site of the late and greatly missed Sheldon Brown, although the article is by Tim McNamara with SB. There is some useful basic information, particularly about dealing with bottom bracket problems. However it is written I think from a professional bike mechanic's point of view and an American one at that and it tends to accentuate perceived negative aspects of the bikes. There are some errors too. It has just been pointed out to me (thanks Steve) that I followed the Sheldon Brown article in making the basic error of saying that Yamaha took over the whole Trusty / Viscount company; whereas they only took on the US dealership.
For some uncontentious nice pictures of early Lamberts, see Classic Rendezvous.
I have previously mentioned the useful information on the CTC forum. Bear in mind that posts are being added all the time, so you might need to search a bit for what you need to know.
Out for a gentle ride on my Lambert (complete with type three death forks) today I managed to collide with a kerb. The forks survived but my inner tube did not.
Thursday, 24 March 2011
About those Lambert / Viscount Death Forks
The amount I have written on this blog so far without mentioning ‘death fork’ and Viscount or Lambert in the same sentence is probably a record. Now I will say a bit about it. Despite dire warnings about ‘death forks’ on the Internet, there are very few facts to back them up.
To begin at the beginning, even the earliest Lamberts (like my 1972 gold plated Professional Grand Prix) had a cast aluminium alloy front fork (the part that holds the front wheel). As with most traditionally constructed bikes, this was attached to a steel ‘steerer’ - the part that turns in the headset bearings and into which the stem holding the handlebars fits. In the early 1970s aluminium forks were extremely innovative if not unique. The idea was (of course) to reduce the weight of the bike. Incidentally the feel of the bike was changed, because aluminium behaves differently to steel under stress. (The modulus of elasticity is different.) Some people don’t like the ‘feel’ of ally forks.
Unfortunately, there were accidents resulting from sudden catastrophic failure of Lambert forks. If you are travelling at any speed, the failure of anything at the front of the bike - fork, wheel, stem or bars - is frightening and potentially very serious. I know of a friend of a friend who experienced Lambert fork failure and was scarred as a result. So I don’t doubt the reality of an ‘injury fork’; even if no-one was killed. The number of forks that broke has been reported as less than 1% of the 30,000 or so bikes made with the ‘death forks’. Unacceptable, but not as bad as some would have you believe.

The third version of the forks, presumably introduced because of continuing failures of the earlier versions, brought in a separate steel crown extension. This screws into the crown of the forks and is secured with Loctite™. The mounting bolt for the front brake passes through the whole assembly and gives further security. The upper part of the steel insert fits into the steerer and is secured with a pin. Information on the Internet is that the third type is very reliable. They are still found on Viscounts that come up for sale, (they were only fitted to the top of the range Aerospace Pro), which have notched up considerable mileages. They were used on the works team bikes in road racing and by others for cyclocross. See this Cycling Touring Club (CTC) forum for more details. Nevertheless, at some point in the late seventies, the new owners of the marque, Yamaha, decided to mount a full-scale product recall of all alloy forks and free replacement with steel (Tange?) ones. I think this must have been a response to continuing bad publicity / bad mouthing about the Lambert forks and the difficulty of telling one type from the other. It is clear that Lambert did not handle the fork problem well and, despite the efforts of Trusty/Viscount to sort out this and the early quality problems, its shadow was still hanging over the bike into Yamaha times.
It is actually quite easy to tell if your bike has a third version fork or one of the earlier ones. First check with a magnet or by inspection that you have alloy (non-magnetic) rather than steel forks. If the latter, you need worry no further. Most Viscount steel forks have traditional square shoulders with lugs. Some have sloping shoulders and look superficially like the alloy forks. Alloy forks were always supplied unpainted; steel ones were painted and often (depending on the model) half chromed.
To check alloy forks, remove the front wheel and the front mudguard (fender) if fitted. Ideally, turn the bike over to get a good look. If the underside of the fork crown - i.e. between the ‘legs’ - is smooth alloy; then you have an early version. I would not suggest that anyone rides a bike with one of these, other than for a sedate Sunday afternoon turn around the park. If you can see a circular indentation in the centre of this part of the forks that you can’t clean away (!), test it with a small magnet, such as a round fridge magnet. You should be able to detect that in the centre there is a magnetic steel part, whereas the rest of the fork is non-magnetic. I am quite happy to ride a bike with an alloy fork of the third kind on a daily basis, as I might with any other twenty-five year old component, but I cannot advise readers what to do.
Finally, in case people think that Lambert and Viscount are the only bikes that have ever had problems, see this recall notice for forks used on a Cervelo bike. As it says ‘The forks steerer can break during normal use. In some circumstances this can cause the rider to lose control, fall and suffer serious injuries’. Might have been written about the Lambert ‘death fork’.
Thanks to the careful reader who pointed out that the Trusty factory was in Bilston, a former steel-making town about 4 miles south-east of Wolverhampton, not in Birmingham as I said. At least I got the region right (West Midlands).
Friday, 11 March 2011
Design Magazine May 1976 - details of Viscount bike
A friend (thanks Steve) has pointed out to me an interesting article on Picasa, reproducing part of the May 1976 Design Magazine. This has an ad. showing a Viscount Aerospace Pro (GB£115 - about US$188 at today's rate of exchange). It mentions the Aerospace range starting with a bike for just under GB£80 (US$131). What model would that have been? Sounds like incredibly good value, even in 1976. At this time the Viscount brand was being produced by 'Viscount-Trusty Ltd.' of Potters Bar, Hertfordshire, UK. (Potters Bar is on the outskirts of London.)
Also from the magazine is a one page article on the Viscount Aerospace bikes that has interesting photographs of a Viscount bottom bracket, pedal and hub that have been sectionalized to show how they were made. The article quotes Cycling magazine as saying that the Aerospace Pro could be used for 'road-racing, time trialling, cyclo-cross, training and touring'. It also mentions a competition model made by Trusty, 'slightly lighter' but twice the price. Does anyone know what bike that was? Any pictures or descriptions?
Many thanks to 'ichibyoshi', who posted this very interesting document. His (could be 'her' I know) other pictures and name suggest a home in Japan. My thoughts are with you and other citizens of Japan and countries of the Pacific whose lives, homes and livelihoods are threatened by the earthquake and tsunami that happened today.
Friday, 4 February 2011
Replacing Viscount bottom bracket bearings
Over last weekend I dismantled the bottom bracket on my 1978 Viscount Aerospace bike and replaced the bearings. This turned out to be quite straightforward - surprising considering all that has been written about these components, but it is fair to say that, according to a friend with more experience of Viscount bottom brackets, I was lucky with this one. It wasn’t too stuck and not rusty.
First I took off the cranks. The spindle wobbled in one of the bearings, showing that replacement was overdue. It was then necessary to remove the circlips, in theory there to stop the spindle sliding through the bearings but probably not doing anything. A proper pair of circlip pliers helps, but you can improvise with little screwdrivers or some such.
To remove the spindle I sized up various tools but picked up a hefty hammer. I tried putting a bit of wood between the hammer and the end of the spindle, but that didn’t work so I just bashed away. Should anyone be following this, put the crank screw in the spindle and hit that. It saves distorting the end of the spindle. However, it might damage the screw, although I was lucky. I had to file the spindle back into shape. It slid quite easily out of the bearings although one of them fell apart. Getting the bearings out required a narrow cold chisel (a six-inch nail might have worked) and the hammer. There are ‘pullers’ for extracting bearings. I have one, but the hammer method is fine when the bearings are shot anyway. The pictures show the shell and the spindle together with an old bearing and a new one (the new one on the left) and the circlips.


After adjusting the position of the spindle and fitting the circlips, the job was done. The cranks went on nice and square and the result is great - sm-o-o-o-th.
If your bb spindle is damaged or lost there are replacements around. The length is 122mm or 123mm, depending on who you read. To my shame, I forgot to measure mine. Anything from 120 - 123mm would probably work as well. Phil Wood at one time made a stainless steel spindle that would be bomb-proof. This one on eBay would probably be ok. YST made a similar spindle. There are other options for replacing Viscount bottom brackets, which I will describe another day.
The bearings are numbered ‘6003’, measuring 35mm outside diameter x 17mm inside diameter x 10mm thick. The ‘6’ gives the type of bearing (single row deep groove) and shows it is a metric size. The first zero is the series, which indicates the thickness and outside diameter. The ‘03’ at the end shows that the bore is 17mm. I found this out from the Gizmology site. If you are buying bearings for your Viscount or Lambert, you will want 6003-2RS ones. The 2RS means that both sides have rubbers seals to keep out dirt and grit.
First I took off the cranks. The spindle wobbled in one of the bearings, showing that replacement was overdue. It was then necessary to remove the circlips, in theory there to stop the spindle sliding through the bearings but probably not doing anything. A proper pair of circlip pliers helps, but you can improvise with little screwdrivers or some such.
To remove the spindle I sized up various tools but picked up a hefty hammer. I tried putting a bit of wood between the hammer and the end of the spindle, but that didn’t work so I just bashed away. Should anyone be following this, put the crank screw in the spindle and hit that. It saves distorting the end of the spindle. However, it might damage the screw, although I was lucky. I had to file the spindle back into shape. It slid quite easily out of the bearings although one of them fell apart. Getting the bearings out required a narrow cold chisel (a six-inch nail might have worked) and the hammer. There are ‘pullers’ for extracting bearings. I have one, but the hammer method is fine when the bearings are shot anyway. The pictures show the shell and the spindle together with an old bearing and a new one (the new one on the left) and the circlips.


I cleaned up the spindle and the seats for the bearings carefully. I was advised to ‘polish’ the spindle (thanks Steve) and I did that. I put one bearing on to the spindle, using an old adjustable spanner to convey the taps of my hammer to the inner ring of the bearing. I thought whether I should put Loctite or anti-seize compound on the spindle and bearing housings and went for the anti-seize, thinking that nothing was likely to move once assembled. Then I just needed to tap the bearings in, opening up the adjustable spanner to strike their outer rings until they were flush with the shell. Here’s a picture of this.

After adjusting the position of the spindle and fitting the circlips, the job was done. The cranks went on nice and square and the result is great - sm-o-o-o-th.
If your bb spindle is damaged or lost there are replacements around. The length is 122mm or 123mm, depending on who you read. To my shame, I forgot to measure mine. Anything from 120 - 123mm would probably work as well. Phil Wood at one time made a stainless steel spindle that would be bomb-proof. This one on eBay would probably be ok. YST made a similar spindle. There are other options for replacing Viscount bottom brackets, which I will describe another day.
The bearings are numbered ‘6003’, measuring 35mm outside diameter x 17mm inside diameter x 10mm thick. The ‘6’ gives the type of bearing (single row deep groove) and shows it is a metric size. The first zero is the series, which indicates the thickness and outside diameter. The ‘03’ at the end shows that the bore is 17mm. I found this out from the Gizmology site. If you are buying bearings for your Viscount or Lambert, you will want 6003-2RS ones. The 2RS means that both sides have rubbers seals to keep out dirt and grit.
Sunday, 30 January 2011
Bottom brackets
On Friday morning I noticed that the bottom bracket spindle on my 1978 Viscount Aerospace Pro seemed to be running loose in its bearings. This caused the chain wheel to wobble and my gear changes to be a bit hit-or-miss. It also prompts me to talk about the bottom brackets used in Lambert and Viscount bikes.
[Note for people who do not speak ‘bike’: The bottom bracket is the bit at the bottom (!) where the pedals go round and round. The spindle (or bottom bracket spindle) is the bit that is attached to the cranks and the chain wheel. (It is a spindle, rather than an axle, because it rotates. Strictly speaking axles don’t turn.) The bearings are what the spindle turns in. Traditionally, the bearings were made up of separate bearing ‘cups’ and loose balls. Together the spindle and bearings make up the ‘bottom bracket’. The part of the frame in which the bottom bracket fits is the bottom bracket shell. Nowadays, most bottom brackets are sealed units.]
Lambert was an early adopter of ‘sealed’ bearing units - in fact industry standard ball bearings. These push fit into the bottom bracket shell and the spindle fits into the bearings. Circlips were fitted to the spindle to stop any tendency to move from side-to-side. A similar arrangement was used on Klein bikes. Here are some photographs and text about changing Klein BBs, which might be of use if anyone is changing a Lambert or Viscount one.
Certain problems arose with the Lambert BBs. Early spindles and crank sets had parallel-sided square ends, unlike the square tapers then usual for cotterless crank sets. This was asking for trouble and the cranks were inclined to work loose as the holes in them became enlarged. Later versions had the normal tapered ends, but there was always a question mark over the accuracy of the machining and the Lambert/Viscount cranks require careful alignment. Another problem that has been reported is early failure of the spindle, which has been attributed to stress-concentration due to the grooves for the circlips, but might be due to poor castings. If this happened when you were cycling fast or going uphill it would certainly be frightening, possibly dangerous. There is a good photograph of Viscount BB spindle failure here and also a way of curing the problem.
Another point is that normal cartridge bearings are not totally ‘sealed’ and they are vulnerable to road dirt getting in and wearing them out. This is probably what has happened to mine.
Next time I’ll write about the options for your Lambert or Viscount bottom bracket, should you need to replace it, and I hope I will have sorted out mine.
Monday, 24 January 2011
History Part 2
In the mid seventies, probably in 1975, perhaps in 1974, definitely by 1976, the production of Lambert bicycles was taken over by an old established English bike manufacturer by the name of Trusty. Jigs for the fillet brazed frames were transferred and the stocks of Lambert branded and special components. The bicycles were now made in Birmingham, England and were called Viscount Aerospace bicycles. Decals / stickers on the down tubes noted that the frames were made by Trusty.
The first Viscounts, as might be expected, were very similar to the Lamberts but, over the next few years, they evolved into rather different bikes. Keeping to the same Aerospace fillet brazed frames they sported more modern paint schemes and over time most of the specially-made components disappeared in favour of bits from Shimano and other component makers.
Building on the experience of Trusty, lower-range bike were also badged as Viscounts. The chronology of this is unclear, but I think that they came in before the company was taken over again, this time by Yamaha, probably in 1978. They included ones with lugged frames that were built in the UK and ones using Taiwanese-made lugged frames. Of the first type were the Sebring 10-speed model, which seems to have been a very popular entry-level ‘racing’ bike and one that many people remember with affection. It began the use of US cities as the model names of Viscount bikes. I had a Tulsa G.L., which had a made-in-Taiwan frame. A collection of details of all these models needs to be made.
In 1980 or ‘81 Yamaha-Viscount stopped using the fillet-brazed frame. The top-of-the range bikes still used the same tubing (or appeared to) and were called Aerospace but the frame was built with rather natty pointed lugs with windows (Prugnat?). Production had at some point moved from Birmingham to Potters Bar, North London (Hertfordshire), where Trusty had a plant. By 1980 use of special, own branded components had entirely ceased.
 I have a 1981 catalogue in which the top of the range is one with a Shimano Dura Ace group set. I’ve never seen one of these. Second was probably the Viscount Aerospace 600ax, with the Shimano 600ax gruppo. Just below that must have been the 600ex (you can guess what that came with). I have one of these and gorgeous it is too.


Then there were a number of variations around the Viscount Aerospace 400 theme. It may be that they were intended to use the Shimano 400 components, but my 400 came with a 600 rear derailleur, Dura Ace front mech, Weinmann brakes and SR chainset. Incidentally Zeus Olimpic 64 pedals were used on lots of Viscount Aerospace bikes, irrespective of the other bits used. But I am digressing into components.
Despite successes in various races and being named as bicycle of the year in 1980, the marque seems to have disappeared completely by 1982 or 1983.
There is a group on Flickr for photographs of Lambert, Viscount and Trusty bikes.
The first Viscounts, as might be expected, were very similar to the Lamberts but, over the next few years, they evolved into rather different bikes. Keeping to the same Aerospace fillet brazed frames they sported more modern paint schemes and over time most of the specially-made components disappeared in favour of bits from Shimano and other component makers.
Building on the experience of Trusty, lower-range bike were also badged as Viscounts. The chronology of this is unclear, but I think that they came in before the company was taken over again, this time by Yamaha, probably in 1978. They included ones with lugged frames that were built in the UK and ones using Taiwanese-made lugged frames. Of the first type were the Sebring 10-speed model, which seems to have been a very popular entry-level ‘racing’ bike and one that many people remember with affection. It began the use of US cities as the model names of Viscount bikes. I had a Tulsa G.L., which had a made-in-Taiwan frame. A collection of details of all these models needs to be made.
In 1980 or ‘81 Yamaha-Viscount stopped using the fillet-brazed frame. The top-of-the range bikes still used the same tubing (or appeared to) and were called Aerospace but the frame was built with rather natty pointed lugs with windows (Prugnat?). Production had at some point moved from Birmingham to Potters Bar, North London (Hertfordshire), where Trusty had a plant. By 1980 use of special, own branded components had entirely ceased.


Then there were a number of variations around the Viscount Aerospace 400 theme. It may be that they were intended to use the Shimano 400 components, but my 400 came with a 600 rear derailleur, Dura Ace front mech, Weinmann brakes and SR chainset. Incidentally Zeus Olimpic 64 pedals were used on lots of Viscount Aerospace bikes, irrespective of the other bits used. But I am digressing into components.
Despite successes in various races and being named as bicycle of the year in 1980, the marque seems to have disappeared completely by 1982 or 1983.
There is a group on Flickr for photographs of Lambert, Viscount and Trusty bikes.
Saturday, 22 January 2011
History Part 1
Although there are several sources on the Internet, the hisory of Lambert and Viscount bikes is anything but clear. A friend of mine is piecing together information from original sources - people who made the bikes, road on the works teams, dealers and early buyers. If you have any facts about the history of the marque, I would be glad to relay them. See some comments on the CTC forum here. It seems that Lambert bikes was a project to produce high quality lightweight bikes much cheaper than those offered by established builders. It was apparently headed by the son of the founder of the Marriot hotel chain, but manufactured its bikes in England. It may have been associated with a revival of the Viking name, the original company having closed in 1967, since some early Lamberts were badged as Vikings. See the Classic Rendezvous site. The first Lamberts seem to have appeared in 1972, using a rather nice lugged frame. Here are some photographs of a frame of one of these I own. It is a gold plated Professional Grand Prix.


An important aspect of the bikes was the use of 'aerospace' tubing for the frame. This is a chromium-molybdenum (cro-moly) steel alloy but not one produced by an established bicycle tube manufacturer like Reynolds or Columbus. It seems to have come from a British company called Phoenix. Although straight gauge (not butted) it produced light frames and was used for the top-of-the range Viscount bikes until the end of that company. Lambert frames carried stickers extolling the virtues of the tubing. Also very obvious on the Lambert bikes was the extensive use of alloy components specially made for the bike, rather than bits from the established component manufacturers. Various theories have been advanced for this and the unusual steel used for the frame. These include: the design team was made up of cycling enthusiasts, determined to produce their ideal bike; there were lots were ex-aircraft engineers in the company, perhaps from cancelled UK projects like the BAC TSR2 bomber (stopped in 1965); and (!) they were all crooks. I think the last can be safely discounted. The components are so interesting that I will blog about them separately. At some point production changed over to a fillet brazed (lugless) frame. This was not a new technique, but such frames are more difficult to produce to a high standard than a standard lugged frame and this must have been one of the few uses of the method at the time on a mass-production scale. Apart from the appearance if it is done well (not to everyone's taste I know), it has some advantage in lightness and strength. Despite what seem to have been quite healthy sales in the US (where most Lambert bikes come up for sale these days), the company got into trouble and after a couple of years it was re-born as Viscount. Which is a good place to stop for now. Keep pedalling!
Thursday, 20 January 2011
Early recollections

I fell in love with Viscount bikes when I was at college in the late 1970s. A friend had a red Viscount Aerospace Sport with fillet brazed frame. It seemed beyond cool. At the time I had an ancient and nameless British lightweight with a pull chain rear derailleur and a suicide lever front derailleur. When I could afford it, in 1981, I went to buy a bike like my friend's but found that Viscount had discontinued the fillet brazed frames, so I bought a blue Viscount Aerospace 400. This had a nicely lugged 'Aerospace' frame. It cost about two hundred pounds, which was quite a lot then but I guess less than a traditional high quality lightweight. I still have this bike although the frame has cracked across the bottom bracket and I have used the components on other bikes. This picture shows the 400 in its original glory.
Subscribe to:
Posts (Atom)